
Before reviewing this section, make sure that you have read Getting Started. Investigators should review this section in addition to the the Using OpenClinica as an Investigator section.
For Information on Using OpenClinica as a Clinical Research Coordinator (CRC), See the Following Sections:
4.1 Entering Data
The features of OC4 data entry include the following:
- Participant Matrix: Easily see the data entry status of participants.
- Auto-save: Automatically save during data entry.
- Conditional field display: Only see relevant fields during data entry.
- Automatic calculations and data checks: Automatically use calculations and checks.
- Queries: Easily create or view queries.
Before You Enter Data
To enter data into OpenClinica, you must do the following:
- Add a Participant
- Schedule an Event
See Adding Participants for more information on adding Participants.
Scheduling an Event
Once a Participant has been added, you can schedule events and start to enter data.
You can schedule events from the Participant Matrix, Participant Details screen, or the Tasks menu.
To Schedule a Visit-Based Event from the Participant Matrix:
- Click the Schedule button for the Participant and the Event that you want to schedule.
- Select Schedule.
- Select a Study Event Definition from the drop-down list.
- (Optional) Select a Start Date/Time. The current date is the start date by default, but you can change it.
- (Optional) Select an End Date/Time.
- (Optional) To schedule additional Events, click Schedule Another Event, and enter information for that Event. Repeat as needed.
- To go to the Participant Details screen to enter data, click the Proceed to Enter Data button.
To Schedule a Visit-Based Event from the Participant Details screen:
- Click the Participant ID or View button next to a Participant on the Participant Matrix.
- Under the Visits header on the Participant Details screen, click Add New.
- Select a Visit Name from the drop-down list.
- The current date is the start date by default, but you can change it.
- (Optional) Click Show advanced options to change the Start Time or End Date/Time.
- (Optional) To schedule additional Visits, click + Add another visit, and enter the new visit information. Repeat as needed.
- When you are ready, click Add visits.
Note: Once a non-repeating event has been scheduled, it will no longer be available in the Add Visits window for that participant.
To Schedule a Visit-Based Event from the Tasks Menu:
- Click the Tasks button in the header bar of Study Runner.
- Select Schedule Event.
- Enter a Participant ID in the Participant ID field.
- Select a Study Event Definition from the drop-down list.
- (Optional) Select a Start Date/Time. The current date is the start date by default, but you can change it.
- (Optional) Select an End Date/Time.
- (Optional) To schedule additional Events, click Schedule Another Event, and enter information for that Event. Repeat as needed.
- To go to the Participant Details screen to enter data, click the Proceed to Enter Data button.
To Add a Common Event from the Participant Details screen:
- Click the Participant ID or View button next to a Participant.
- Under a header for a common event on the Participant Details screen, click Add New.
Note: For Common Events, such as Adverse Events and Concomitant Medications, a visit date is not required, and the Add New button opens the form directly.
Entering Data
To Enter Data Directly into Forms:
- Click the Add New button to add a form associated with the Event. This will open the form directly for you to document.
- Click the Edit button in the three dots menu to open the form.
- Enter information into each field.
To Continue to the Next Page of the Form:
Click the Next button.
To Mark Data Entry Complete:
Click the Complete button.
To Close the Form and Continue Data Entry Later:
Click the Close button.
Note: If you cannot access a Form, the access to that Form might be restricted in your Study.
To Download Data for Files, Audio Recordings, Videos, Images, Annotations, Drawings, or Signatures
Click the Download button that appears in the field. This button is available in Edit, Review-Only, and Read-Only modes.
Event/Form Independent Attributes
Event/Form Independent Attributes are separate from the Event/Form Statuses. Each Event or Form has a single status, but can have multiple attributes. For example, an Event might be Completed, Signed, and Locked.
The Participant Matrix
Once you have entered data for Participants, use the Participant Matrix to view and navigate Participant records.
The Participant Matrix lists visit-based events across the top and participant IDs down the side. Each icon represents the status of the participant/event combination.
A legend of the icons is listed on the left side of the screen.
Hover over the icons in the Participant Matrix to see more details about the participant event. Click an icon for options to view and/or edit data, depending on your access.
You can filter Events by status, including the independent statuses of Locked and Signed. You can also filter Events with Not Locked and Not Signed.

Note: If you filter Events with a status of Not Started, the Participant Matrix only includes Events that were previously started and then deleted, i.e. Events that have never been started are excluded.
If you have a repeating Event for a Participant, the Participant Matrix shows the least complete status. For example, if the first event is data entry started and the second event is completed, only the status of data entry started will display.
For information on removing, reassigning, and restoring Participants, see Reviewing and Managing Data.
The Participant Details Page
To access the Participant Details Page, click on the Participant ID or the View button that corresponds to that Participant.
The Participant Details Page is divided into sections. Below the General Information section, there are sections for Visits and repeating or non-repeating Common Repeating.
The General Information section displays information about the Participant, the study, the site, and the Participant status.
Common Events collect data that is not necessarily related to a specific visit, but may occur between visits (e.g., adverse events, concomitant medications, or early termination). When you view the Participant Details screen, all Visit-Based Events are listed first, followed by the Common Events.
The Participant Details Page includes Visit-based Events and related forms followed by any common events and related forms.
The page initially opens with the Visit-Based Events displayed and all Common Events collapsed.
To Expand the Common Events Section:
Click the Expand All link to expand all sections including Common Events or click an individual common event section to expand only that section.

The Update Event Screen
To update an Event status from the Participant Details screen, click the three-dot menu on the event and select Edit.
Available statuses are Data Entry Started, Completed, Stopped, and Skipped.
If you are a Data Manager or Administrator, you can click the Lock Event button at the bottom of the screen to lock the Event.

If you are an Investigator or Data Specialist, you can click the Sign Event button to sign. You cannot remove an Event from this screen.

Event and Form Statuses/Actions
Events appear on the Participant Matrix, Participant Details screen, and many other screens throughout Study Runner. If you click on the Event on the Participant Matrix, you can choose from some of the actions.
Note: If you filter Events with a status of Not Started, the Participant Matrix only includes Events that were previously started and then deleted, i.e. Events that have never been started are excluded.

Form Statuses and Attributes do not appear on the Participant Matrix, but do appear on the Participant Details screen, and many other screens throughout Study Runner.

Use the three-dot Actions menu to view all available actions for the Events and Forms.

Alternatively, hover over the form card to view the default action for the form and click the form card to take the default action. The default action is based off of your role and the status of the form.

For Common Events on the Participant Details screen, the Independent Attributes appear in the Form Status column. Actions are available within the menu in the first column in the table.

The form that was opened most recently is indicated by the yellow background.
Below are tables that display the statuses and actions you can take on Events and Forms. Below the tables are instructions on how to perform each action.
Event Statuses
Icon | Status | Description |
| Not Scheduled | The Event has not been scheduled. Common Events, such as Adverse Events remain in this status throughout the study. |
| Scheduled | The Event has been scheduled, but no data has been entered. |
| Data Entry Started |
|
| Completed | A user has completed data entry for at least one Form in the Event. If further changes are needed in that Form, you are required to provide a reason for change. |
| Skipped | The user has decided not to complete the Event. Any data that has been entered can still be viewed and/or exported. You can select this setting from the dropdown menu on the Update Event screen when the current status is scheduled. |
| Stopped | The Participant has temporarily stopped participating in the study. You can select this status from the dropdown menu on the Update Event screen when the current status is data entry started. |
| Removed | The Event has been removed. Users can still view Forms. This will supersede any of the other statuses. |


Event Attributes
Icon | Status | Description |
| Signed | The Event has been signed. This icon appears in addition to the status. |
| Archived | The Event was archived in Study Designer. This icon appears in addition to the status. |
| Locked | A Data Manager locked the Event. No data can be added, and the Event cannot be removed. This icon appears in addition to the status. |


Event Actions
Icon | Action | Description |
| Enter/Edit | Enter or edit data in the Form. |
| View | View data in the Form. |
| Remove | Remove the Form from the Event. This is not permanent. |
| Restore | Restore a Form that was previously removed. All data is restored. |
| Clear Form |
|
| Reassign CRF Version | Change the version of the Form if data has already been entered. |


Form Statuses
Icon | Status | Description |
| Not Started | The Event has been scheduled, but no data has been entered on the Form. |
| Initial Data Entry | The user has opened the Form and/or started to enter data, but the Form has not been completed. |
| Completed | The user has completed data entry on this Form. |
| Removed | This Form has been removed or the Event it is in has been removed. Users can still view the Form. This will supersede any of the other statuses. |


Form Attributes
Icon | Attribute | Description |
| Signed | The Form has been signed. This icon appears in addition to the status. |
| Archived | The Form was archived in Study Designer. This icon appears in addition to the status. |
| Locked |
|


A red asterisk (*) on a form card indicates that the form is required.
Form Actions
Icon | Action | Description |
| Enter/Edit | Enter or edit data in the Form. |
| View | View data in the Form. |
| Remove | Remove the Form from the Event. This is not permanent. |
| Restore | Restore a Form that was previously removed. All data is restored. |
| Clear Form | Clear all data in the Form. This resets the Form to Not Started and closes all associated queries, but audit history is retained. |
| Reassign a CRF to a new Version | Change the version of the Form if data has already been entered. |


Events
To View an Event:
Click the View button in the three dots menu on the Participant Details screen.
Edit an Event:
Click the View button in the three dots menu on the Participant Details screen.
To Lock an Event:
If you are a Data Manager you can lock an Event so that no Form data can be entered or edited and Forms cannot be removed, restored, or cleared.
Click the Lock button in the three dots menu on the Participant Details screen.
or
Click the Edit button in the three dots menu on the Participant Details screen. On the Update Study Event screen, click the Lock button under Other Actions.
To Sign an Event:
If you are an Investigator or Data Specialist, you can sign an Event to indicate that all Forms have been reviewed and approved.
Events must have a status of completed, stopped, or skipped before they can be signed. The Event cannot have been archived or removed. To sign a participant event, first review the data captured in the event, then change the status to signed.
Click the Sign button in the three dots menu on the Participant Details screen.
or
Click the Edit button in the three dots menu on the Participant Details screen. On the Update Study Event screen, click the Sign button under Other Actions.
Note: If an Event is signed, changes to an item in a Form in that Event removes the signature. This also occurs if an Event status is changed from completed, stopped, skipped or Not Scheduled after being signed. In addition, this changes the Participant Status from signed to available and the Event Status to completed.
Archiving/unarchiving or removing a form will unsign the Event. The exception is that when archiving/unarchiving, a form with a status of Not Started will not be unsigned.
Multiple users can sign an Event, so even if an Event has already been signed, the Sign action will still be available. If there are multiple signatures, the most recent one appears on the Form, and the others appear in the Audit Log.
To Remove an Event:
Click the Remove button in the three dots menu on the Participant Details screen. Enter a Reason for Change and click Remove Event from Study.
Note: If an Event is removed after being signed, the signature is invalidated, and if restored, the form must be signed again.

To Restore an Event:
If you have removed an Event you want to restore, click the Restore button in the three dot Event Actions menu on the Participant Details screen. Enter a Reason for Change and click Restore Event to Study.

Note: If an Event is removed after being signed, the signature is invalidated, and if restored, the Form must be signed again. When data was entered on the Form prior to the Event being removed, The event this form is in has been removed appears at the top of the Form.
Forms
To View a Form:
Click the View button in the three dots menu on the Participant Details screen.
To Enter/Edit Form Data:
Click Edit in the three dots menu on the Participant Details screen. If you have permission to access the Form, you can start entering or editing data.
If you edit a form that has already been completed, you must enter a reason for change.

If your changes do not meet form requirements, such as constraints, you will see a message alerting you that specific values have errors and must be changed.
To Remove a Form:
Click the Remove button in the three dots menu on the Participant Details screen. Enter a Reason for Change and click Remove Event CRF.
Note: If a Form is removed after being signed, the signature is invalidated, and if restored, the form must be signed again.

To Restore a Form:
Click the Restore button in the three dots menu on the Participant Details screen. Enter a Reason for Change and click Restore Event CRF.
Note: If a Form is removed after being signed, the signature is invalidated, and if restored, the Form must be signed again.

To Clear a Form:
To clear form data, click the Clear Form button in the three dots menu on the Participant Details screen. The system does the following:
- Clears all data from the Form
- Closes all queries associated with the Form
- Removes a signature, if present
- Sets the Status of the Form to Not Started
- Records this action in the Participants Audit Log.
To Print a Form:
- Click the Print button that appears at the top of the screen for each Form.
- Enter information on the Options screen
- (Optional) Check the checkbox next to Show to include Query and Edit History on the printed Form.
- Select a Paper Size.
- Select a Paper Orientation.
Note: The Paper Size and Paper Orientation fields appear only for Forms with the Style of theme-grid and printing options must be set correctly in your browser for these settings to take effect.
- Click the Prepare button to show a preview.
- Click the Print button.

Note: If your form includes a visual analog scale item, the Background graphics browser setting must be selected in the print screen so that the scale will display properly on the printed form.

Queries
Review the Data and/or Add a Manual Query:
- Click the Cancel button.
- Review the value to make sure you entered it correctly.
- If the value is correct, create the query that includes an appropriate message for that value. Otherwise, change the value.
Allow the System to Automatically Create a Query for the Value in Question:
- Click the Proceed button.
- The system auto-generates a query based on the default message text defined in the Form.

Functional approval by Kate Lambert. Signed on 2024-07-10 10:46AM
Approved for publication by Paul Bowen. Signed on 2024-07-18 12:08AM
Not valid unless obtained from the OpenClinica document management system on the day of use.
Revision History
Revision | Published | Approved By |
Updated for Stack 19 | Paul Bowen | |
Updated for Stack 19 | Paul Bowen | |
Riley Bianchi | ||
S17.3 - updated screenshots for common event section changes. | Paul Bowen | |
S17 - reason for change, updated for forms and events. | Paul Bowen | |
Updated required attribute and updated screenshots for Edit Event page. | Paul Bowen | |
Paul Bowen | ||
Kerry Tamm | ||
Kerry Tamm | ||
Kerry Tamm | ||
Fixed font size | Kerry Tamm | |
Updated | Kerry Tamm | |
Added View Data information | Kerry Tamm | |
Removed broken image | Kerry Tamm | |
Publishing | Paul Bowen | |
publish | Ben Baumann | |
publish | Ben Baumann | |
publish | Ben Baumann | |
reviewed/approved for publication | Laura Keita | |
publish | Ben Baumann | |
publish | Ben Baumann | |
publish | Ben Baumann | |
not visible to viewers yet...just building it. | Laura Keita | |
publishing to test doc structure; not available to users | Laura Keita |
4.2 Queries (CRC)
Definitions:
|
The system creates queries automatically if you close a Form that has unaddressed errors. You can also manually create queries as needed.
Another user can respond to a query and/or change the response in the field. Only Data Managers and Monitors can close queries.
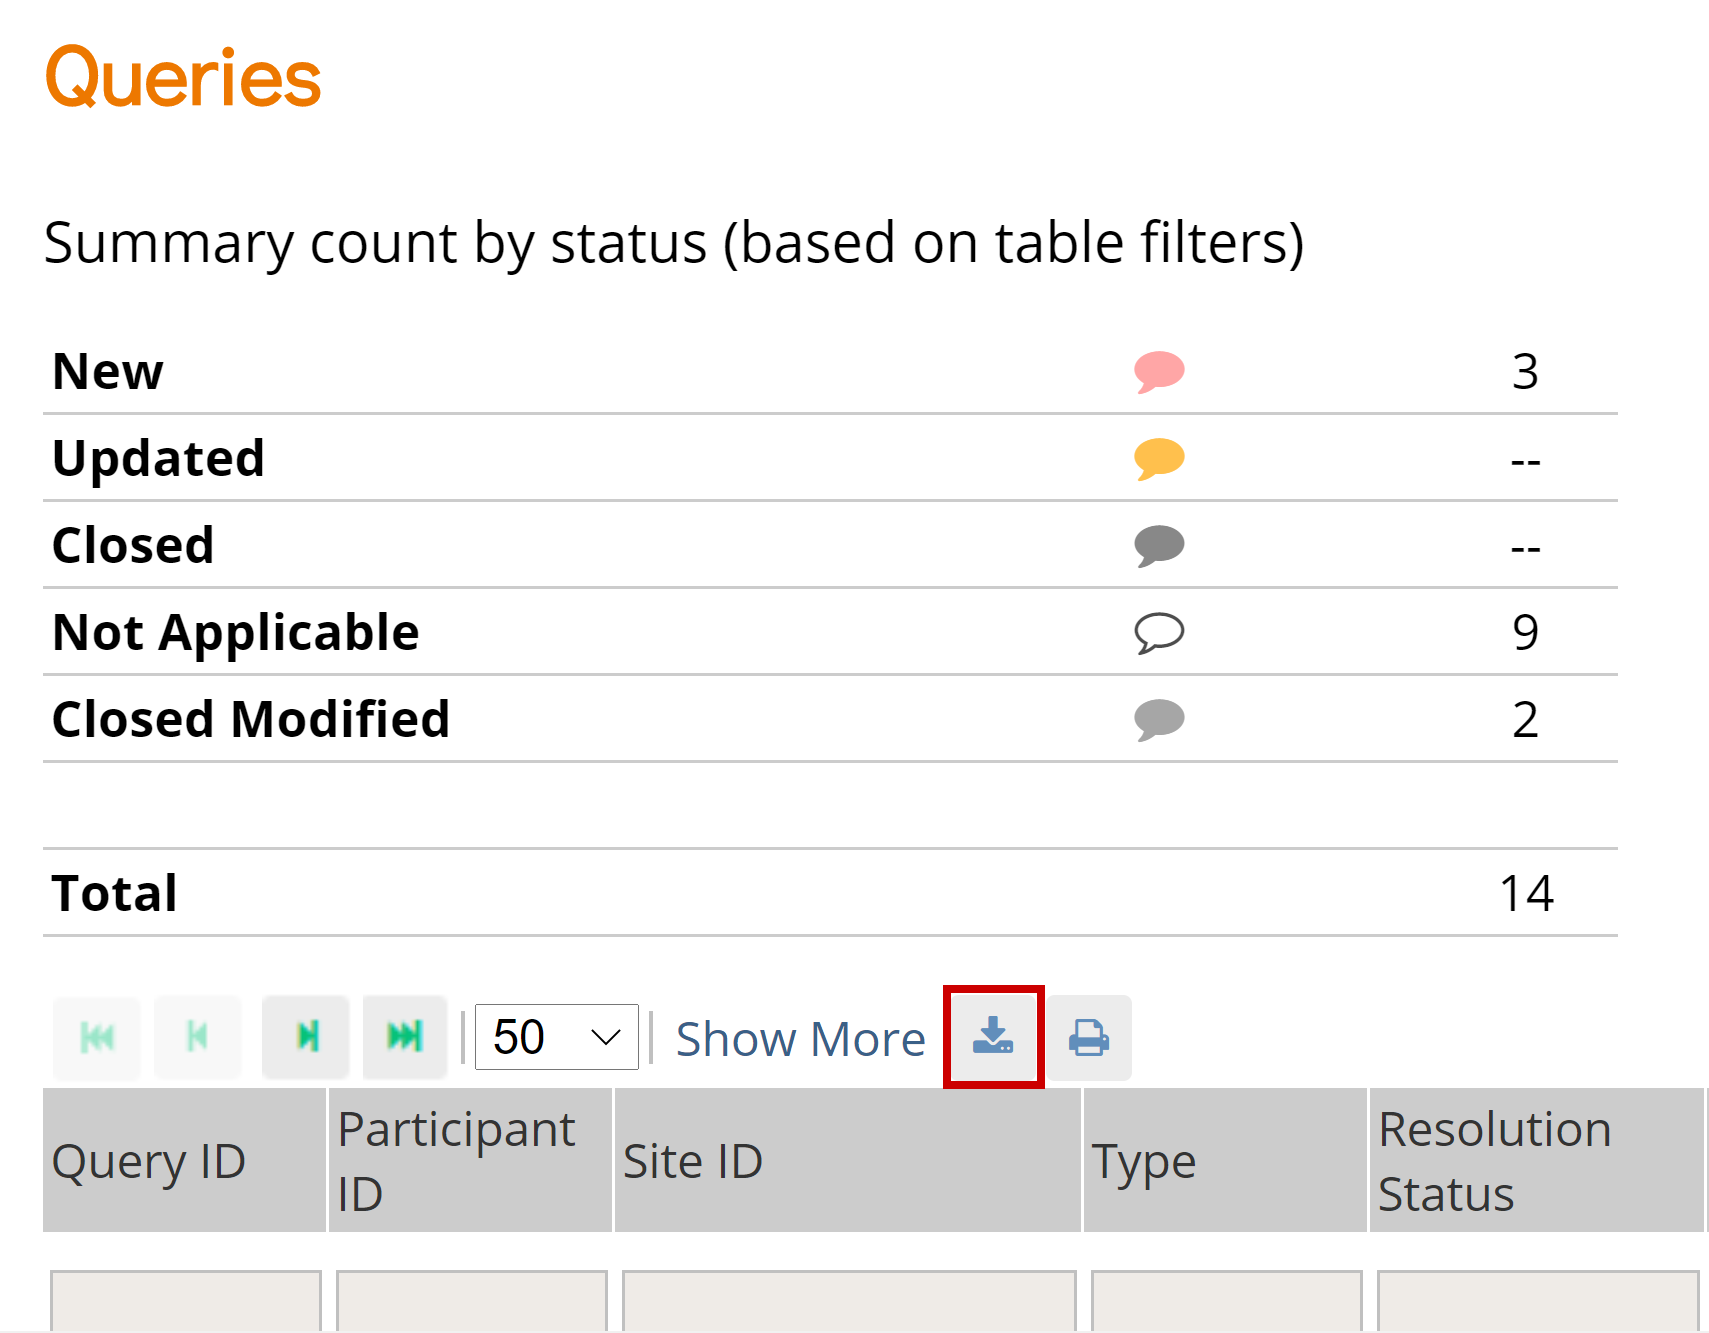
The Queries Table
A table displays queries, annotations, and reasons for change. Details about each query, annotation, or reason for change are listed in the Detailed Notes column.

You can click Show More at the top of the table to show more columns.
To filter by reason for change, click the gray filter box under the Type column, and select Reason for Change. You can change the view of the Queries screen to filter any column that includes a gray filter box.

The Table Below Displays Statuses for Queries and Annotations:
Icon | Status | Description |
| No Query | Click this bubble to create a query. |
| New | A query has been added by either a site user (e.g., a comment/annotation), data manager, or monitor, or was auto-generated by OpenClinica based on built-in edit checks. |
| Updated | Either a site user, data manager, or monitor has added information to the query. |
| Closed | The query is considered resolved by the data manager or monitor. |
| Closed Modified | Slightly paler than Closed, this means the data was changed after the query was closed. |
| Multiple New Queries | You can select each query from the sidebar. |
| Multiple Updated Queries |
|
| One or Multiple Annotations | You can select each annotation from the sidebar. |


To Review Data Associated with a Query, You Have Two Options:
Icon | View | Description |
| View Query Only | This option displays a shaded background showing the item value in question, with the query and item history in the foreground. You can add a query comment, assign the query, and you have the option of emailing the assigned user. All users with access to queries can update the query; only Data Managers and Monitors have access to close a query. |
| View Query Within Record | This option displays a shaded background of all the item values on the form for that query. You have access to update the query and update and/or review all the data on the form. This provides reviewers with more context when reviewing specific item data issues. |


You can access these options from the Actions column of the Queries table.

View Query Only:

View Query Within Record:

You can then update the query comment, use the x to close the query details, and review the entire form in question. Data Managers and Monitors have the additional option of closing the query.
If an item only displays based on the response to another question, there may be instances where an item was conditionally displayed, a query was added to that item, and then the response to the lead-in question was changed, so that item is no longer displayed. That query still exists, however, and needs to be addressed.
Similarly, if there is a form that has repeating records and a query was added to a row, but that row has since been deleted, the query still exists, but is no longer displayed on the form. OpenClinica informs you of these hidden items and provides an option for resolving the associated queries.
For example, when the item in question is a response that has since been hidden, or is on a repeating record that has since been deleted, the following message displays:

To review the remaining data on that form, click OK and review the data. To review the data for the item in question, return to the Queries screen and use the View Query Only icon for that query (as instructed in the message).
Creating Queries
Use Case(s):
- Participant data does not match the source record.
- Participant data is clinically inaccurate.
- Participant data contains a typographical error.
- A form needs to be marked complete but an edit check prevents it.
- Information is missing from a form.
- A form in an Event was not started on time.
Users can create queries to inquire about participant data.
Note: Each query is automatically assigned an ID that is unique to the study environment (i.e. Test or Production). The ID appears in the Queries widget but is not visible until you close and reopen the Form. It also appears on the Queries table.
You can add multiple queries regardless of any existing ones.
You can only add/respond to queries and annotations in Edit Mode, as determined by your User Role. You cannot do so in Read-Only Mode or Review-Only Mode.
You can view the history for all queries and annotations on a single item by selecting View All History, or you can view the history of each query or annotation individually by selecting that query or annotation from the left panel. If you check the Show value changes checkbox, each value change is included in the history.
Best Practice:
- If a form has not been started when it should have been, a Data Manager can add a query to the events start date.
- When a query is created, it should be assigned to the correct recipient. If action is required excluding if the query needs to be closed, the Email checkbox should be checked off.
- A new query should be created for a single issue, instead of combining multiple issues.
- A new query should be created rather than reopening a query that has already been closed.
To Create a Query:
- Open a Form.
- Click the Query Bubble in the field you want to create a query for.
- Click the +New button next to Queries.
- In the Add a new query field, enter text explaining the possible error or question.
- (Optional) Select a user from the drop-down list next to Assign to. If you want to email that user to notify them about the query, check the box next to Email. When a query notification email is sent, it includes the Query ID for easy access.
- Click the Add Query button.

Responding To/Updating Queries
Use Case(s):
- A response is required for the query to be resolved.
- Participant data must be changed for the query to be resolved.
Users can update queries by responding to a query and/or changing data in the form. If data is changed, they will be prompted to enter a reason for change.
Note: You can only add/respond to queries and annotations in Edit Mode or Review-Only Mode, as determined by your User Role. You cannot do so in Read-Only Mode.
You can view the history for all queries and annotations on a single item by selecting View All History, or you can view the history of each query or annotation individually by selecting that query or annotation from the left panel. If you check the Show value changes checkbox, each value change is included in the history.
Best Practice:
- All users can view a list of queries that have been assigned to them by expanding the Quick Links header in the left-hand sidebar and clicking Queries Assigned to Me.
- Data Managers can view a list of queries that have been assigned to them by clicking Queries Assigned to Me on the Home screen.
- When a query is responded to/updated, it should be assigned to the correct recipient. If action is required, the Email checkbox should be checked off.
- Data Managers and Monitors should review the entire queries list regularly to check for unassigned queries.
- If a conditional field (a field that appears based on the response to another field) has a query on it but a user has changed the response to the main field so that the conditional field no longer appears, the query still exists and needs to be addressed, but the field no longer appears on the Form. To review the remaining data on that Form, click OK, and review the data.
- If there is a form that has repeating records, and a query was added to a row, but that row has since been deleted, the query still exists, but no longer appears on the Form. A message appears to inform you of these hidden items and provides an option for resolving the associated queries. To review the remaining data on that Form, click OK, and review the data.
To Respond to or Update In a Form:
- Open a Form.
- Click the Query Bubble in the field you want to create a query for.
- Select the query you want to respond to and/or update.
- (Optional) If you need to change information in a form, close the Query widget, and make changes to the Form manually. You must provide a Reason for Change before completing the Form.
- In the Respond to query field, enter text explaining the query response.
- (Optional) Select a user from the drop-down list next to Assign to. If you want to email that user to notify them about the query, check the box next to Email. When a query notification email is sent, it includes the Query ID for easy access.
- Click the Update button to add the response and leave the query open.
To Respond to or Update a Query from the Queries Table:
- Click View Query Only or View Query within record in the Actions column of the Queries table.
- (Optional) If you need to change information in a form, close the Query widget, and make changes to the form manually. You must provide a Reason for Change before completing the form.
- In the Respond to query field, enter text explaining the query response.
- (Optional) Select a user from the drop-down list next to Assign to. If you want to email that user to notify them about the query, check the box next to Email. When a query notification email is sent, it includes the Query ID for easy access.
- Click the Update button to add the response and leave the query open.

Closing Queries
Only Data Managers and Monitors can close queries.
Annotations
Use Case(s):
A user adds an annotation to keep track of workflow
You can add an annotation to a field to make a note. Annotations cannot be assigned, responded to or closed.
Best Practice: Annotations should not contain clinical information.
Note: You can view the history for all queries and annotations on a single item by selecting View All History, or you can view the history of each query or annotation individually by selecting that query or annotation from the left panel. If you check the Show value changes checkbox, each value change is included in the history.
To Enter an Annotation:
- Open a Form.
- Click the Query Bubble in the field for which you want to create an annotation.
- Click the +New button next to Annotations.
- In the Add a new annotation field, enter text for the annotation.
- Click the Add Annotation button.

Note: Annotations are indicated with an i icon. They appear as N/A in the Query ID column and Not Applicable in the Resolution Status column.
Downloading Queries, Annotations, and Reasons for Change
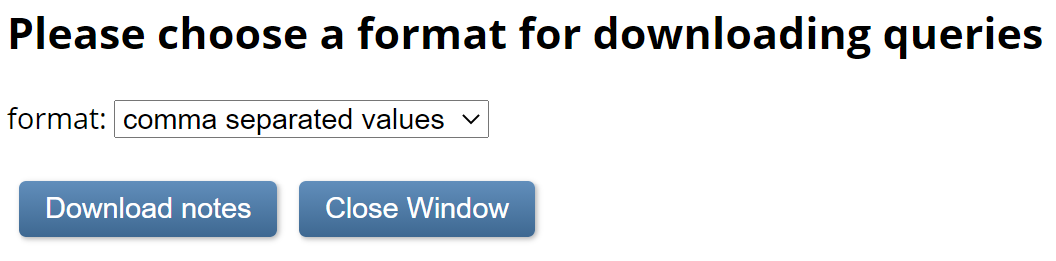
To Download Queries, Annotations, and Reasons for Change:
- Click the Download button at the top of the table. A Download window appears.
- Select comma-separated values or portable document format in the format field.
- Click the Download notes button.
Printing Queries, Annotations, and Reasons for Change
To Print Queries, Annotations, and Reasons for Change:
- Click the Print button at the top of the table. A Print window appears.
- Click ctrl + p (Windows) or command + p (Mac) or click Ok, right click the window, and select Print.


Functional approval by Riley Bianchi. Signed on 2022-03-23 10:45AM
Approved for publication by Paul Bowen. Signed on 2022-04-13 12:18AM
Not valid unless obtained from the OpenClinica document management system on the day of use.
Revision History
Revision | Published | Approved By |
Updated name to include CRC and updated screenshots to no longer show "close query" option. | Paul Bowen | |
Added RFC to definitions at the beginning. | Paul Bowen | |
Kerry Tamm | ||
Kerry Tamm | ||
Kerry Tamm | ||
Kerry Tamm | ||
Kerry Tamm | ||
Kerry Tamm | ||
Kerry Tamm | ||
Kerry Tamm |
4.3 Add Participants
Definition: A Participant is a person who participates in your study and provides data. This could be a patient receiving treatment or a test subject in a clinical trial. |
Example: A Participant might have a specific demographic or medical condition that is required to participate in the study. |
You must add Participants to a Study before you can enter data for those Participants. There are different ways to add Participants:
Your study must have a Status of Available to add Participants.
Best Practice: OpenClinica recommends adding Participants at the site-level instead of the study-level. A site should be created for Participants even if they do not belong to a physical site. Before adding Participants, click the Change button in the header bar of Study Runner to select a site.
Study-level Participants can’t be created in bulk via API, added to Participate, or have data entered for them because CRCs and Investigators can’t see them. In addition relevance logic that requires that the user knows the site can’t be triggered at the study level.
Depending on the Study Settings, Studies can be Configured to Allow You to Do One of the Following:
- Manually enter the Participant ID.
- Automatically generate a Participant ID based on a predefined format template.
- Add Participants in batch using Web Services (for Administrators with Data Manager access).
Note: If you do not see the Add New Participant link above the Participant Matrix, either your User Role does not have access to add Participants, or the Data Manager has set a limit for the number of Participants allowed in the study, and your study has reached the maximum number of Participants. In addition, you cannot add Participants if a study has a status of In Design, Frozen, or Locked. If you are a Data Manager and want to change the maximum number of Participants allowed for a study, see the Study Settings information in Create a Study.
To Manually Add a Participant ID:
If your Data Manager has chosen the Manual Method of Creation:
- From the Tasks menu, select Add Participant, or on the Participant Matrix screen, click Add New Participant above the matrix.
- Enter a Participant ID in the Add New Participant screen. (This should be a unique identifier, e.g. 001).
- Click the Add button.

To Make the System Automatically Generate a Participant ID:
If your Data Manager has chosen the Automatic Method of Creation:
- From the Tasks menu, select Add Participant, or on the Participant Matrix screen, click Add New Participant above the matrix.
- Click the Add button in the Add New Participant screen to generate a Participant ID.

To Add Participants in a Batch:
- From the User menu, select Administration.
- Click the Web Services Information button.
- Execute the API to create a batch of Participant IDs.
Once you have added a Participant to your study, you can enter data.
Approved for publication by Kate Lambert. Signed on 2025-05-29 4:33PM
Not valid unless obtained from the OpenClinica document management system on the day of use.
Revision History
Revision | Published | Approved By |
Removed information about how to configure automation of Participant ID generation, as it is not applicable to CRCs. | Kate Lambert | |
Kerry Tamm | ||
Kerry Tamm | ||
Kerry Tamm | ||
Kerry Tamm | ||
Kerry Tamm | ||
Kerry Tamm | ||
Removed unneeded sections | Kerry Tamm | |
Reverted | Kerry Tamm | |
Changed Invalid status to Removed | Kerry Tamm | |
Updated name of screen | Kerry Tamm | |
Updated note about archived icon | Kerry Tamm | |
Added note about archived icon | Kerry Tamm | |
Updated Scheduling section | Kerry Tamm | |
Fixed lists | Kerry Tamm | |
Added images | Kerry Tamm | |
Fixed typo | Kerry Tamm | |
Added info on statuses and actions | Kerry Tamm | |
publish | Ben Baumann | |
publish | Ben Baumann | |
publish | Ben Baumann |
Was this article helpful?
That’s Great!
Thank you for your feedback
Sorry! We couldn't be helpful
Thank you for your feedback
Feedback sent
We appreciate your effort and will try to fix the article