Before reviewing this section, make sure that you have read Getting Started.
For Information on Using OpenClinica as a Data Manager, See the Following Sections:
7.1 Queries (Data Manager)
Definitions:
|
The system creates queries automatically if you close a Form that has unaddressed errors or you can manually create a query.
Another user can respond to it and/or change the response in the field. Only Data Managers and Monitors can close queries.
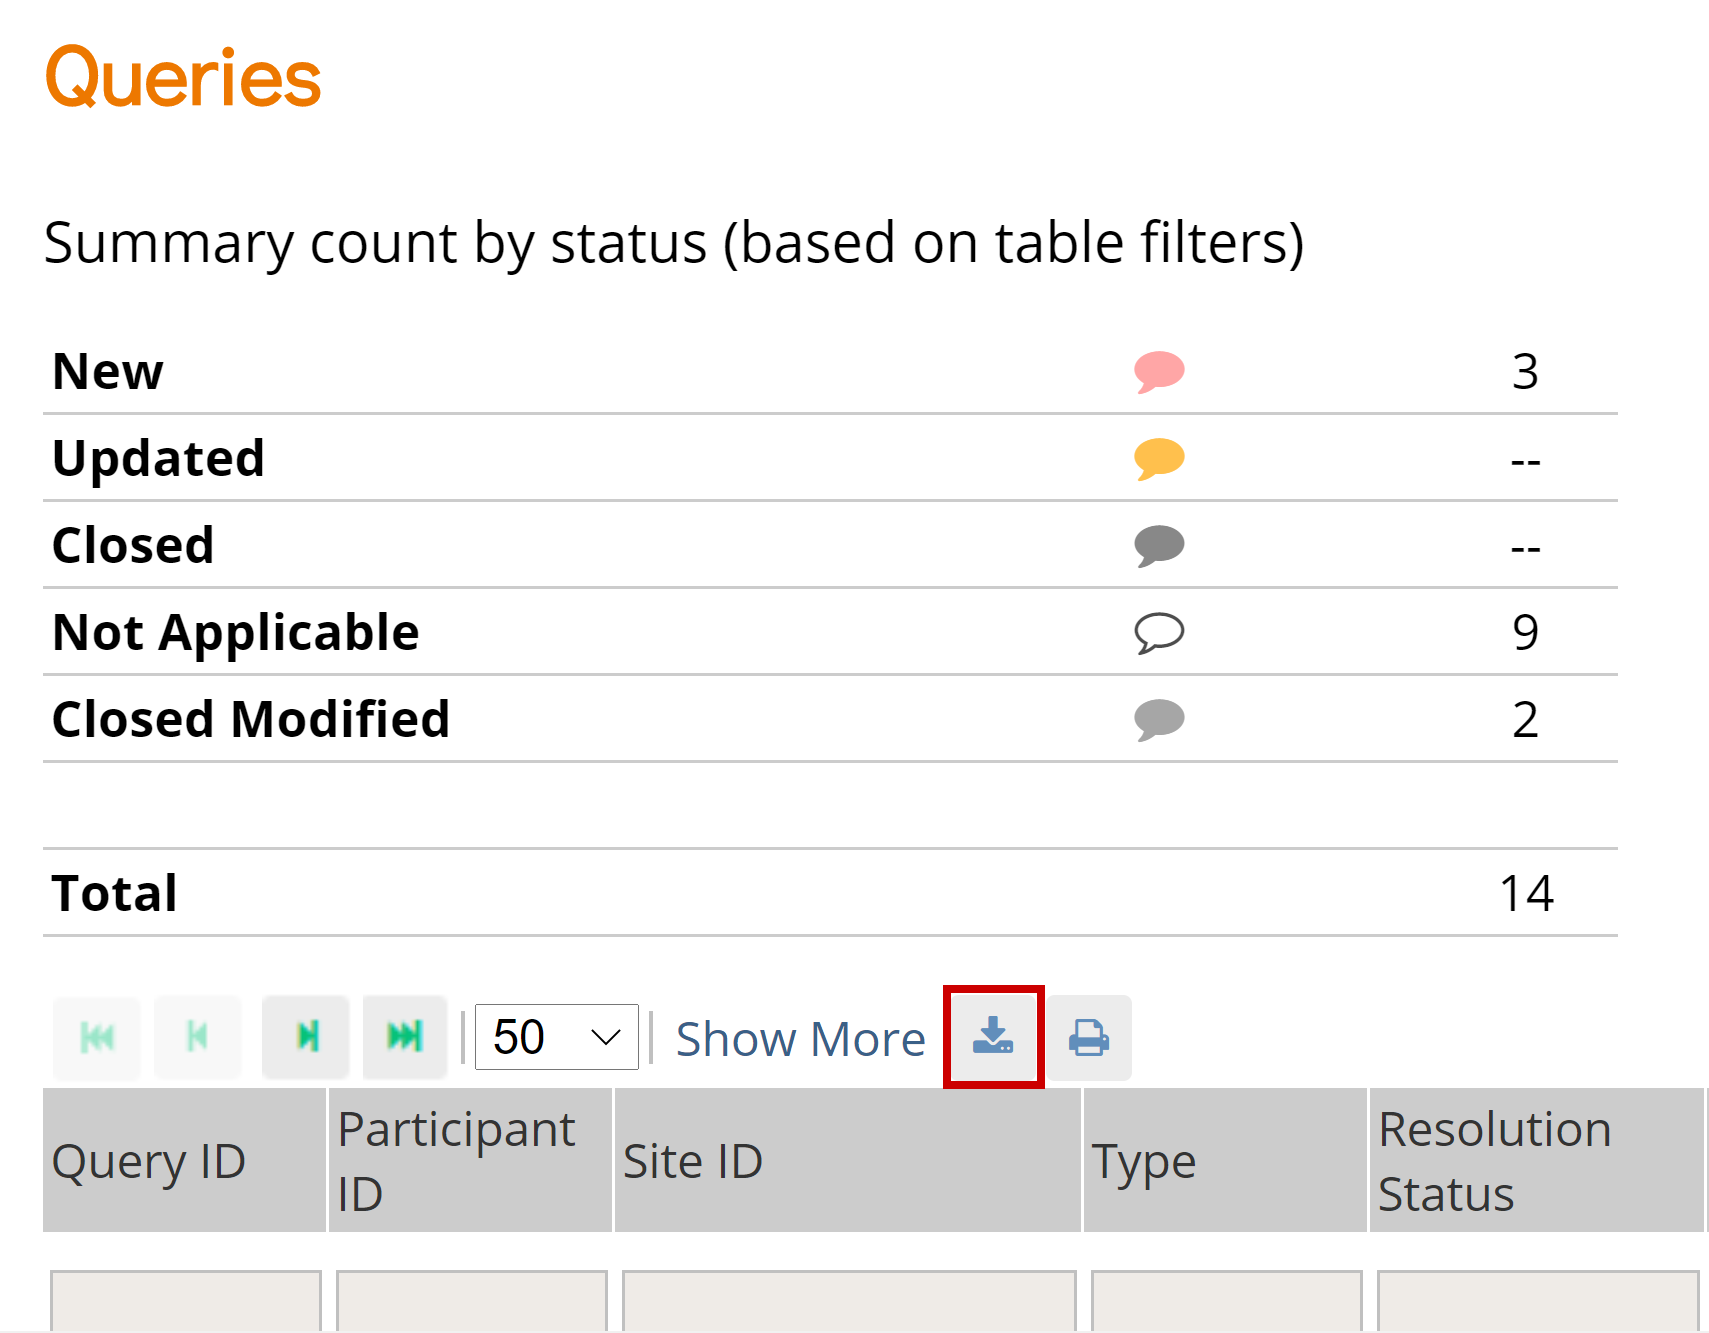
The Queries Table
A table displays queries, annotations, and reasons for change. Details about each query, annotation, or reason for change are listed in the Detailed Notes column.

You can click Show More at the top of the table to show more columns.
To filter by reason for change, click the gray filter box under the Type column, and select Reason for Change. You can change the view of the Queries screen to filter any column that includes a gray filter box.

The Table Below Displays Statuses for Queries and Annotations:
| Icon | Status | Description |
|---|---|---|
 | No Query | Click this bubble to create a query. |
 | New | A query has been added by either a site user (e.g., a comment/annotation), data manager, or monitor, or was auto-generated by OpenClinica based on built-in edit checks. |
 | Updated | Either a site user, data manager, or monitor has added information to the query. |
 | Closed | The query is considered resolved by the data manager or monitor. |
 | Closed Modified | Slightly paler than Closed, this means the data was changed after the query was closed. |
 | Multiple New Queries | You can select each query from the sidebar. |
 | Multiple Updated Queries | You can select each query from the sidebar. |
 | One or Multiple Annotations | You can select each annotation from the sidebar. |
To Review Data Associated with a Query, You Have Two Options:
| Icon | View | Description |
|---|---|---|
 | View Query Only | This option displays a shaded background showing the item value in question, with the query and item history in the foreground. You can add a query comment, assign the query, and you have the option of emailing the assigned user. All users with access to queries can update the query; only Data Managers and Monitors have access to close a query. |
 | View Query Within Record | This option displays a shaded background of all the item values on the form for that query. You have access to update the query and update and/or review all the data on the form. This provides reviewers with more context when reviewing specific item data issues. |
You can access these options from the Actions column of the Queries table.

View Query Only:

View Query Within Record:

You can then update the query comment, use the x to close the query details, and review the entire form in question. Data Managers and Monitors have the additional option of closing the query.
If an item only displays based on the response to another question, there may be instances where an item was conditionally displayed, a query was added to that item, and then the response to the lead-in question was changed, so that item is no longer displayed. That query still exists, however, and needs to be addressed.
Similarly, if there is a form that has repeating records and a query was added to a row, but that row has since been deleted, the query still exists, but is no longer displayed on the form. OpenClinica informs you of these hidden items and provides an option for resolving the associated queries.
For example, when the item in question is a response that has since been hidden, or is on a repeating record that has since been deleted, the following message displays:

To review the remaining data on that form, click OK and review the data. To review the data for the item in question, return to the Queries screen and use the View Query Only icon for that query (as instructed in the message).
Creating Queries
Use Case(s):
- Participant data does not match the source record.
- Participant data is clinically inaccurate.
- Participant data contains a typographical error.
- A form needs to be marked complete but an edit check prevents it.
- Information is missing from a form.
- A form in an Event was not started on time.
Users can create queries to inquire about participant data.
Note: Each query is automatically assigned an ID that is unique to the study environment (i.e. Test or Production). The ID appears in the Queries widget but is not visible until you close and reopen the Form. It also appears on the Queries table.
You can add multiple queries regardless of any existing ones.
You can only add/respond to queries and annotations in Edit Mode or Review-Only Mode, as determined by your User Role. You cannot do so in Read-Only Mode.
You can view the history for all queries and annotations on a single item by selecting View All History, or you can view the history of each query or annotation individually by selecting that query or annotation from the left panel. If you check the Show value changes checkbox, each value change is included in the history.
Best Practice:
- If a form has not been started when it should have been, a Data Manager can add a query to the events start date.
- When a query is created, it should be assigned to the correct recipient. If action is required excluding if the query needs to be closed, the Email checkbox should be checked off.
- A new query should be created for a single issue, instead of combining multiple issues.
- A new query should be created rather than reopening a query that has already been closed.
To Create a Query:
- Open a Form.
- Click the Query Bubble in the field you want to create a query for.
- Click the +New button next to Queries.
- In the Add a new query field, enter text explaining the possible error or question.
- (Optional) Select a user from the drop-down list next to Assign to. If you want to email that user to notify them about the query, check the box next to Email. When a query notification email is sent, it includes the Query ID for easy access.
- Click the Add Query button.

Responding To/Updating Queries
Use Case(s):
- A response is required for the query to be resolved.
- Participant data must be changed for the query to be resolved.
Users can update queries by responding to a query and/or changing data in the form. If data is changed, they will be prompted to enter a reason for change.
Note: You can only add/respond to queries and annotations in Edit Mode or Review-Only Mode, as determined by your User Role. You cannot do so in Read-Only Mode.
You can view the history for all queries and annotations on a single item by selecting View All History, or you can view the history of each query or annotation individually by selecting that query or annotation from the left panel. If you check the Show value changes checkbox, each value change is included in the history.
Best Practice:
- All users can view a list of queries that have been assigned to them by expanding the Quick Links header in the left-hand sidebar and clicking Queries Assigned to Me.
- Data Managers can view a list of queries that have been assigned to them by clicking Queries Assigned to Me on the Home screen.
- When a query is responded to/updated, it should be assigned to the correct recipient. If action is required, the Email checkbox should be checked off.
- Data Managers and Monitors should review the entire queries list regularly to check for unassigned queries.
- If a conditional field (a field that appears based on the response to another field) has a query on it but a user has changed the response to the main field so that the conditional field no longer appears, the query still exists and needs to be addressed, but the field no longer appears on the Form. To review the remaining data on that Form, click OK, and review the data.
- If there is a form that has repeating records, and a query was added to a row, but that row has since been deleted, the query still exists, but no longer appears on the Form. A message appears to inform you of these hidden items and provides an option for resolving the associated queries. To review the remaining data on that Form, click OK, and review the data.
To Respond to or Update In a Form:
- Open a Form.
- Click the Query Bubble in the field you want to create a query for.
- Select the query you want to respond to and/or update.
- (Optional) If you need to change information in a form, close the Query widget, and make changes to the Form manually. You must provide a Reason for Change before completing the Form.
- In the Respond to query field, enter text explaining the query response.
- (Optional) Select a user from the drop-down list next to Assign to. If you want to email that user to notify them about the query, check the box next to Email. When a query notification email is sent, it includes the Query ID for easy access.
- Click the Update button to add the response and leave the query open.
To Respond to or Update a Query from the Queries Table:
- Click View Query Only or View Query within record in the Actions column of the Queries table.
- (Optional) If you need to change information in a form, close the Query widget, and make changes to the form manually. You must provide a Reason for Change before completing the form.
- In the Respond to query field, enter text explaining the query response.
- (Optional) Select a user from the drop-down list next to Assign to. If you want to email that user to notify them about the query, check the box next to Email. When a query notification email is sent, it includes the Query ID for easy access.
- Click the Update button to add the response and leave the query open.

Closing Queries
Use Case(s):
- The information on the form has been changed to address the query.
- A response clarifies why the existing information is accurate.
Data Managers and Monitors can close queries when the issue has been resolved. Data Managers and Monitors are also the only user roles with the ability to reopen a closed query.
Best Practice:
- A new query should be created rather than reopening a query that has already been closed.
- If a conditional field (a field that appears based on the response to another field) has a query on it but a user has changed the response to the main field so that the conditional field no longer appears, the query still exists and needs to be addressed, but the field no longer appears on the Form. To review the remaining data on that Form, click OK, and review the data.
- If there is a form that has repeating records, and a query was added to a row, but that row has since been deleted, the query still exists, but no longer appears on the Form. A message appears to inform you of these hidden items and provides an option for resolving the associated queries. To review the remaining data on that Form, click OK, and review the data.
To Close a Query In a Form:
- Open a Form.
- Click the Query Bubble in the field you want to create a query for.
- Select the query you want to close.
- Click the Close button.
To Close a Query from the Queries Table:
- Click View Query Only or View Query within record in the Actions column of the Queries table.
- Click the Close button.

Queries can also be closed in bulk using the Data Review Table.
Annotations
Use Case(s):
A user adds an annotation to keep track of workflow
You can add an annotation to a field to make a note. Annotations cannot be assigned, responded to or closed.
Best Practice: Annotations should not contain clinical information.
Note: You can view the history for all queries and annotations on a single item by selecting View All History, or you can view the history of each query or annotation individually by selecting that query or annotation from the left panel. If you check the Show value changes checkbox, each value change is included in the history.
To Enter an Annotation:
- Open a Form.
- Click the Query Bubble in the field for which you want to create an annotation.
- Click the +New button next to Annotations.
- In the Add a new annotation field, enter text for the annotation.
- Click the Add Annotation button.

Note: Annotations are indicated with an i icon. They appear as N/A in the Query ID column and Not Applicable in the Resolution Status column.
Downloading Queries, Annotations, and Reasons for Change
To Download Queries, Annotations, and Reasons for Change:
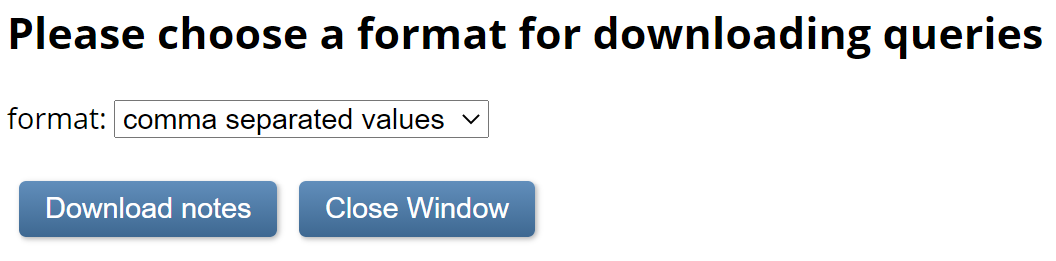
- Click the Download button at the top of the table. A Download window appears.
- Select comma-separated values or portable document format in the format field.
- Click the Download notes button.
Printing Queries, Annotations, and Reasons for Change
To Print Queries, Annotations, and Reasons for Change:
- Click the Print button at the top of the table. A Print window appears.
- Click ctrl + p (Windows) or command + p (Mac) or click Ok, right click the window, and select Print.


Functional approval by Riley Bianchi. Signed on 2022-03-21 12:04PM
Approved for publication by Paul Bowen. Signed on 2022-04-13 12:18AM
Not valid unless obtained from the OpenClinica document management system on the day of use.
Export PDFRevision History
| Revision | Published | Approved By |
|---|---|---|
| Updated page name to include Data Manager (to differentiate from other queries pages) | 2022-04-13 00:18AM | Paul Bowen |
| 2021-01-19 11:42AM | Kerry Tamm | |
| 2020-11-30 10:20AM | Kerry Tamm | |
| 2020-11-30 09:49AM | Kerry Tamm | |
| 2020-11-30 09:27AM | Kerry Tamm | |
| 2020-11-16 15:30PM | Kerry Tamm | |
| 2020-11-16 10:43AM | Kerry Tamm | |
| 2020-11-11 11:14AM | Kerry Tamm | |
| 2020-11-10 13:24PM | Kerry Tamm | |
| 2020-11-10 11:56AM | Kerry Tamm | |
| 2020-11-10 11:39AM | Kerry Tamm | |
| 2020-11-05 09:49AM | Kerry Tamm | |
| 2020-11-02 15:27PM | Kerry Tamm |
7.2 Source Data Verification
| Definition: Source Data Verification (SDV) is the process of reviewing and verifying data against source records to ensure accuracy. |
The Source Data Verification screen is the Monitor’s Home screen where they perform Source Data Verification (SDV).
To Access the Source Data Verification screen:
Click Tasks in the header bar of Study Runner, and select Source Data Verification.
The SDV Table
The Source Data Verification table displays the SDV Status, Open Queries, SDV Requirements, CRF Status, etc.

SDV Requirements
SDV requirements are defined by your study protocol. Data Managers and Administrators can specify the level of SDV requirement for each item on a form in Study Designer. Below is a table that displays basic definitions of each SDV Requirement.
| Icon | SDV Requirement | Description |
| (No Icon) | Not Applicable (Default) | SDV is not applicable for this form. |
 | Not Required | SDV is not required for the form, but you can still perform SDV if you want. This is often used when 10% of Forms need to be SDVed. Each form record is verified or unverified all together, rather than item-by-item |
 | Partial Required | Some fields on the form must be verified. Each form record is verified or unverified all together, rather than item-by-item |
 | 100% Required | Every field in the form must be verified. Each form record is verified or unverified all together, rather than item-by-item |
 | Item-Level | Item-Level SDV allows you to choose which items will be part of SDV by selecting Required, Optional, or Not Applicable for each individual item on a form. Item records will then be marked as Verified or Not Verified independently and will become unverified independently if their data changes on the form. |
 | Item-Level (To be configured) | This indicates Item-Level SDV was selected, but is not configured validly since all items are set to Not Applicable. Use the Configure SDV link on the Form card in Study Designer to set each item to Required, Optional, or Not Applicable. At least one item needs to be Required or Optional, otherwise change the form’s SDV Requirement to Not Applicable. |
Not all forms will have all SDV Requirement options available. The SDV options are related to when the form was created and when it was published to Production in relation to the Stack 15 release (December 20th, 2021). The SDV options on forms are as follows:
- Form first published to Production prior to Stack 15 release: Not Applicable, Not Required, Partial Required, 100% Required
- Form created prior to Stack 15 release, but not yet published to Production: Not Applicable, Not Required, Partial Required, 100% Required, Item-Level
- Form first published to Production after Stack 15 release with one of the following statuses – Not Required, Partial Required, 100% Required: Not Applicable, Not Required, Partial Required, 100% Required
- Form first published to Production after Stack 15 release with one of the following statuses – Not Applicable, Item-Level: Not Applicable, Item-Level
- Form created after Stack 15 release: Not Applicable, Item-Level
- Individual items have the following SDV Requirement options: Required, Optional, or Not Applicable
- When first selecting Item-Level on a form, the item is set to Optional by default. Additional items that are added will default to Not Applicable.
- Individual items have the following SDV Requirement options: Required, Optional, or Not Applicable
Item-Level SDV Requirements:
- Not Applicable: items cannot be verified
- Optional: items can be verified
- Required: items must be verified for the form to be fully verified and get Verified status
The Source Data Verification table only displays completed forms with an SDV requirement other than Not Applicable.
You can click Show More to show more rows or filter a column by clicking the gray box below the column header.
Forms can have a status of Ready to verify, Changed since verified, or Verified.
Items can have a status of Not Verified, and Verified.
SDV Form Statuses are as follows:
| Icon | Status |
 | Ready to verify |
 | Changed since verified |
 | Verified |
You can sort the columns, such as Event Date by clicking the column header.
The Open Queries column displays the number of queries that are open (New or Updated) for a specific CRF. This is a good way to keep track of which CRFs are likely to change due to outstanding queries.
If the number of queries is 0, the number appears as plain text. If the number of queries is greater than 0, it appears as a link. If you click the link, it takes you to the Queries screen, which is filtered to the Participant, Form, and Event that the row in the SDV table corresponds to.
The CRF Status column displays the status of the form as well as whether it is Locked, Signed, etc.
Click the View CRF (magnifying glass) button in the Actions column to open the form in Review-Only mode (unless the form is in a status of Locked, in which case, the form opens in Read-Only mode).
Click Data to view form information and review the items individually. Use the radio buttons in the upper-right corner to view only the specific data you want to review on the form:
Form Level:
- Show all items: displays all items on the form
- Show only changed since last Verified: displays items that have had a value changed since the form was verified
Item-Level:
- Show all items: Shows all items on the form regardless of SDV requirement or status
- Show all SDV items: Shows all SDV Required or SDV Optional items regardless of status
- Show items needing verification: Shows all SDV Required items with unverified status
Verifying Data
Use Case(s):
- The information on the form has been changed to address a query.
- A response clarifies why the existing information is accurate.
- The SDV Plan requires Source Data Verification regardless of whether or not there is a query.
To Perform Source Data Verification:
- Click the View icon in the Actions column to view the completed form.
- Compare the data entered in the form against the source record. If there are any discrepancies between the source record and the data on the form, click the Query Bubble for the item in question and create a query for the site to address.
- Complete the review of the data and close the form.
- Click Verify to verify all items on that form, or
- Check off each form on the SDV Forms Table and then click Verify All Checked to verify multiple forms at once.

Alternatively, you can click the Data button and review the data. Then select items to verify and click Verify All Checked.

When the final SDV Required item on a form becomes Verified, the form will become Verified. If there are no SDV Required items configured on a form, verifying the final SDV Optional item on a form will verify the form.
Clicking Verify for a form will mark all SDV Required items on that form as verified. Clicking Verify for a form will not mark SDV Optional items as verified.
Note: If you inadvertently marked a record as Verified, you can reset its status by clicking the double-check icon in the SDV Status column. You are prompted to confirm resetting the status. If a form is marked as not verified after it was verified, this does not reset the status for all items on the form. Use the Data button to update the SDV status for individual forms as needed.
Changes Made After Verification
Form-Level:
If a value on a verified form was changed, the status of the form will become Changed since verified, and the form must be verified again.
Item-Level:
If the value of a verified item (Required or Optional) was changed:
- If the form was verified, the form becomes Changed since verified and the item becomes Not Verified
- If the form was not verified, the status of the form does not change, and the item becomes Not Verified
If the value of an unverified SDV Optional item changed after the form was verified, the form status will remain Verified.
If an additional repeating group occurrence containing a Required item was added to the form:
- If the form was verified, the form becomes Changed since verified and the Required item remains Not Verified.
- If the form was not verified, the status of the form does not change and the Required item remains Not Verified.
Functional approval by Kate Lambert. Signed on 2024-10-23 10:31AM
Approved for publication by Paul Bowen. Signed on 2025-02-10 1:43PM
Not valid unless obtained from the OpenClinica document management system on the day of use.
Revision History
| Revision | Published | Approved By |
|---|---|---|
| Updated contents to make functionality around SDV Option items clearer. | 2025-02-10 13:43PM | Paul Bowen |
| S17 - resubmitted with the last changes. | 2022-06-28 15:16PM | Paul Bowen |
| 2021-12-22 22:35PM | Paul Bowen | |
| 2021-01-19 11:44AM | Kerry Tamm | |
| 2020-11-30 10:33AM | Kerry Tamm | |
| 2020-11-16 15:31PM | Kerry Tamm | |
| 2020-11-05 09:47AM | Kerry Tamm | |
| 2020-11-02 11:53AM | Kerry Tamm | |
| 2020-11-02 11:04AM | Kerry Tamm |
7.3 Reviewing and Managing Data
Data can be reviewed using the Participant Matrix, Queries, or Source Data Verification screen.
Review and Manage Data from the Participant Matrix
The Participant Matrix
Typically, Data Managers and Monitors are responsible for reviewing data, but anyone with access to the Participant Matrix can view/review data as needed. Data Managers can also remove a participant and/or reassign a participant to a different site. The actions column presents the appropriate actions available, based on your user role.
The following displays the actions available to a Data Manager:

Remove a Participant
Data Managers have access to remove Participants.
Removing a Participant does not delete the Participant, but instead removes access to that Participant’s data. The data for that subject can still be viewed, but cannot be edited and will not be included in data extracts.


Once a Participant is removed from the study, the Remove icon changes to a Restore icon. To restore access to that Participant’s data, simply click the restore icon and the data is available again for editing and extracts.


When removing or restoring a participant, you will be required to enter a reason for change.
Reassign a Participant
Data Managers also have access to reassign a Participant to another site. This may be needed if a Participant moves to a different location but still wants to continue on the study.
Prior to reassigning, be sure that the original site has an extract of that Participant’s data. Then, to reassign a Participant, click the Reassign icon. Specify the new site and click Reassign Participant.


The new site has immediate access to that Participant’s forms and all data previously collected for the Participant. The original site no longer has access to that Participant’s ongoing data.
View, Edit, Lock, Remove and Restore Events
Click an Event icon on the Participant Matrix to display a pop-up. Then, click the action you want to take.
When removing or restoring an event, you will be required to enter a reason for the change.
Note: When reviewing a form which had data entered prior to the event being removed, you will see the message “The event this form is in has been removed” at the top of the form.
Review Participant Data
To review data, click the View icon for the participant whose data you’d like to review.
To review data on a specific form, click the View icon for that form.

Filter Participant Details
As you review data, you can enter search criteria for the Common Events – for example, to show only AEs that are ongoing. You can also change the number of rows listed for any of the Common Events, and you can sort Common Events by clicking any of the column headings. When you customize anything related to what is displayed for Common Events, the Custom View On button displays at the top of the Participant Details screen. Custom View On also displays when collapsing or expanding sections (changing from their default), sorting and searching in the Visits section, and changing the default Showing record filter in the upper right corner (Active Records, All Records, Removed Records).

The Custom View is active for that participant throughout the time you are logged into OpenClinica. If you view a different Participant’s details, the view might not be customized, or it may be a different customization. In the example above, throughout the current session, any time you view participant 001, that same custom view is in effect, even if you leave the page and come back to the same participant.
To clear a custom view, click the X on the Custom View On button and all view customizations are removed for that participant, bringing you back to the default view. The Custom View could be as simple as collapsing the General Information section or searching for a specific form name, but it will persist on that participant until you either clear the custom view by clicking the X, manually change the custom view back to the default, or begin a new session.
Filtering records using the Showing option in the upper right corner of the Participant Details screen filters Visits as well as Common Events. The three options for filtering records are Active Records, Removed Records (includes Archived as well), and All Records. When visits or forms are filtered from display, text will display to let you know how many records are hidden.


Form Migration
Definition: Form migration is the ability to transfer data from one Form version to another.
Example: A Data Manager might choose to migrate Form data in order to update the Form to a new version.
Data Managers can migrate Form data on a Participant-by-Participant basis or in a batch.
If multiple versions of a form are available before data has been entered, any user can choose which version to use. The forms with multiple versions will display the default on the form card.
When clicking on the form card, the form will open in the default version.
To edit the form in a version other than the default, click the actions menu and select which version to use.

However, if data has already been entered and a new Form version becomes available afterward, you must have a User Role of Data Manager to migrate Form data. You can migrate data either on a Participant-by-Participant basis or in a batch.
Form Migration Causes the Following:
- Audit Log: Form migration appears in the Audit Log for the Participant(s) the data was migrated for.
- Extracts: If data existed in the original Form version that does not exist in the new Form version, that data does not appear on extracts.
- Response Options: You can remove responses, but the values in the Name field for those that remain cannot be changed. For example, if the options were Mild, Moderate, and Severe (1, 2, and 3) you can remove Severe, but you cannot change Mild from 1 to any other value.
Note: Data will not be deleted from the database due to Form version migration, even if it no longer exists in the new Form version. (See Potential Migration Outcome Examples below for more information.)
Requirements:
- Data Entry Status: Data Entry Started
- Study Status: Available
- User Role: Data Manager
- Participant Status: Active
- Event Status: Active (not removed, locked, or skipped)
- Form Status: Active (not removed)
- New Form Version: Active (not removed)
- Previous Form Version: Active (used for initial data entry)
Prerequisites:
- The study must contain at least 2 versions of a Form.
- The study must be published.
Participant-by-Participant Migration:
- Click the View button for the Participant on the Participant Matrix.
- Click the three dot menu on the form card and select Reassign version.

3. Select the new Form version in the New CRF Version field.
4. Click the Continue button.

Batch Migration:
- In the header bar of Study Runner, click Tasks.
- Select CRFs under Monitor and Manage Data.
- (Optional) Confirm that you are planning to migrate to and from the correct version. You can either View the Form or Download Annotated CRF.
- Click the Batch CRF Version Migration button next to the CRF you want to update.

- Select the current version of the Form in the Current Version of (Form Name) field.
- Select the new version of the Form in the New Version of (Form Name) field.
- (Optional) Select a site to update the version at. (The default is all sites.)
- (Optional) If the Form is in multiple events, select an Event to update the version in. (The default is all Events.)
- Click the Preview button.

- Verify the Migration Summary information that appears below the Preview button.
- Click the Migrate button.
When you return to the CRF screen, the following message appears under Alerts in the sidebar: Batch CRF version migration is running. You will receive an email once the process is complete
The email you receive has a link to a report of the migration, which provides a list of all Participants and Forms that the data was migrated for.
Potential Migration Outcome Examples:
Example A: More Items in Original Form Version than New Form Version:
Before Migrating from Version A to B:
- Version A has an item named meditem2.
- Version B does not have an item named meditem2.
- Both versions have an item named item1.
After Migrating from Version A to B:
- Data for meditem2 is migrated but not visible on the Form.
- Data for item1 is migrated and is visible on the Form.
- Data from both versions appears on extracts, so there are more items.
Example B: More Response Options Available in Original Form Version than New Form Version:
Before Migrating from Version A to B:
- Both CRF versions have an item named item1.
- Version A has the response options X, Y, and Z.
- Version B only has the response options X and Y.
- The user selected the response option Z in the original Form version.
After Migrating from Version A to B:
- Data for item1 is migrated, but it will appear as though no response was selected since response option Z no longer exists in the new Form version.
- For single-select types: New data will overwrite existing data.
- For multi-select types: New response options will be added. (If the user selected the response option Z in the original Form version, and that option no longer exists in the new version of the Form, if they then select the response option Y, both the values of Z and Y will be stored in the database.)
Example C: The maximum number of repeats in the original Form version exceeds that in the new Form version:
Before Migrating from Version A to B:
- Both Form versions have a repeating group named group1.
- The repeat count in Form A is 5.
- The repeat count in Form B is 3.
- The user entered data for 5 repeats.
After Migrating from Version A to B:
- Only 3 rows of data appear on the Form even though version A had 5 repeats.
- No additional data can be entered.
Approved for publication by Kate Lambert. Signed on 2025-06-30 4:48PM
Not valid unless obtained from the OpenClinica document management system on the day of use.
Revision History
| Published | Approved By | |
|---|---|---|
| Updated optional confirmation step in Batch Migration | 2025-06-30 16:48PM | Kate Lambert |
| Added optional View step in Batch Migration. | 2025-06-30 16:41PM | Kate Lambert |
| S17 - resubmitted. | 2022-08-22 16:28PM | Riley Bianchi |
| added anchor link | 2022-05-10 10:38AM | Riley Bianchi |
| updated per Paul's comments on filtering | 2021-12-21 22:26PM | Paul Bowen |
| Updated for PDP | 2021-12-20 23:54PM | Paul Bowen |
| 2020-11-30 14:25PM | Kerry Tamm | |
| 2020-11-16 15:34PM | Kerry Tamm | |
| 2020-11-16 10:45AM | Kerry Tamm | |
| 2020-11-05 09:09AM | Kerry Tamm | |
| 2020-11-02 12:18PM | Kerry Tamm | |
| Formatting | 2020-09-18 16:13PM | Kerry Tamm |
| Repeat count/ migration fixes | 2020-09-18 16:10PM | Kerry Tamm |
| Updated extracts error about data migration | 2020-09-17 08:31AM | Kerry Tamm |
| Publishing | 2020-09-11 15:10PM | Kerry Tamm |
| Reverted | 2020-08-21 12:46PM | Kerry Tamm |
| Removed link | 2020-07-23 08:23AM | Kerry Tamm |
| Fixed numbered/bulleted lists | 2020-07-20 10:58AM | Kerry Tamm |
| Fixed numbers and bullet points | 2020-07-20 10:35AM | Kerry Tamm |
| Fixed error | 2020-07-20 09:56AM | Kerry Tamm |
| Screenshot | 2020-07-17 12:43PM | Kerry Tamm |
| Added screenshots | 2020-07-17 12:41PM | Kerry Tamm |
| Best Practices | 2020-07-17 12:11PM | Kerry Tamm |
| Resized image | 2020-06-29 14:18PM | Kerry Tamm |
| Add SDV info | 2020-06-29 14:17PM | Kerry Tamm |
| Added Form Migration Info | 2020-06-24 13:13PM | Kerry Tamm |
| publish | 2018-09-14 08:12AM | Ben Baumann |
| publish | 2018-06-28 21:38PM | Ben Baumann |
| published | 2018-04-23 14:02PM | Ben Baumann |
| test | 2017-06-09 16:11PM | Laura Keita |
| 2017-06-09 15:58PM | Laura Keita |
7.4 Suggested SOPs
List of Suggested Data Management Standard Operating Procedures for Electronic Data Capture
The following list of Standard Operating Procedures (SOPs) is a suggested set of SOPs for users of electronic data capture (EDC) systems. This is in no way meant as an exhaustive list, but is instead presented as a recommended minimum set of data management procedures. For a complete list of required SOPs, please consult the current regulations and guidelines applicable to your business and/or study(ies). OpenClinica’s professional services team can help you develop SOPs, or review your existing SOPs.
In addition to this list, organizations that use electronic systems for clinical trials should audit the vendor(s) of the software system(s) used to ensure the appropriate development SOPs were in place and followed appropriately throughout the development of the software.
| SOP | Description |
| 1. Development and maintenance of SOPs | Define the SOP template and the development, review/approval process for all SOPs, including roles/responsibilities, SOP release/distribution requirements, SOP version control, etc. |
2. SOP Deviations | Describe the process for reporting and documenting any deviations from the SOPs. Be sure to address planned as well as unplanned deviations. |
3. Data Privacy and Protection | Describe the process for ensuring data privacy and protection within your organization as well as via your software solution/service (if applicable). |
4. Document/File/Study Binder Management | Describe the process for managing all documents related to study conduct. Include details on any differences between in-house vs. CRO-conducted studies. What is the version control process for the Study Binder? |
5. Data Management Roles and Responsibilities | Clearly define the roles and responsibilities for all users participating in study data management. |
6. Data Management Plan (DMP) | Describe the DMP template. Be sure to include a list of the SOPs to be followed, the clinical data management system to be used, descriptions of data sources, data handling processes, data transfer formats and process, and quality control procedures to be applied. Define the process for developing, approving, and maintaining the Data Management Plan. Include details on version control. |
7. Data Monitoring Plan | Describe the Data Monitoring Plan template. The Data Monitoring Plan should ensure:
If partial data monitoring is used, be sure to specify exactly what partial data monitoring means for the study in question (e.g., 100% monitoring for a list of critical data values, 100% verification of 20% of the subjects, etc.) Define the process for developing, approving, and maintaining the Data Monitoring Plan. Include details on version control. |
8. Statistical Analysis Plan | Describe the Statistical Analysis Plan template and define the process for developing, approving, and maintaining the Statistical Analysis Plan; include details on version control. |
9. e-CRF Design and Development | Define the process for design, development, and standardization of eCRFs. Be sure to include details for the design, development, approval, and version control process. |
10. Study-Specific Database Design | Describe the process for setting up any study-specific attributes (anything outside of your standard eCRFs). This may include annotated CRFs or design documents. |
11. Edit Check/Data Validation Programming | Document the process for creating edit check specifications, as well as edit check development, review and approval, testing, documentation, and version control. |
12. Study User Acceptance Testing (UAT) | Define what testing is required and what documentation is required to demonstrate that the study passed validation. Specify who gives approval for use of the system. Testing should not be performed by the person who built the study database. |
13. Data Entry | Define the process for entering and editing data. Data entry should address general guidelines (inputting scientific symbols (if applicable), use of UI features, etc.) as well as how/where to document study-specific guidelines. |
14. Data Receipt and Handling | Define the different means by which data may be received. Be sure to address all types of data receipt EDC, ePRO, imports, web services, paper, etc. |
15. Discrepancy Management | Define the process for reviewing and resolving data discrepancies, and define roles and responsibilities associated with discrepancy management. |
16. Coding | Define the process for coding adverse events and medications, any review process involved, and the change control or re-coding process. |
17. Serious Adverse Event Reconciliation | Define the process for handling serious adverse events and the reconciliation process between data management and safety surveillance. Define any review timeframes and sign-off procedures that may be required prior to locking the database. |
18. Lab Data Management | Define the process for handling laboratory data. If necessary, differentiate between local vs. central labs and the data import and discrepancy resolution process. |
19. Data Extraction and Validation | Define the process for extracting data and the method for verifying that the data that was extracted matches the data that was entered into the system. |
20. Data Transfer and Validation | Define the process for transferring data to other systems and the method for verifying that the data that was transferred matches the data that was entered into the original system. |
21. Database Security | Describe the requirements, methods, and tests that ensure your database is secure. This should include username/password requirements, password expiration, means for resetting passwords, how system/study access is granted/revoked, roles and role-based access, etc. |
22. Database Lock/Unlock/Closure | Define the process for locking, unlocking, and closing a database. Include details on lower-level (e.g., event-level locking) if lower-level locking methods are used. Address investigator signature requirements prior to locking. |
23. Data Retention and Archival | Define the data retention, archival, and retrieval process. For databases managed by external sources (CRO, hosting service provider), define the process for accessing the database throughout your defined retention period. This should include the clinical data, eCRFs, and discrepancies/resolutions. |
24. CRO and Vendor Management | Detail the CRO / vendor selection and management process. Address sign-off procedures, meeting frequency, metrics, etc. Also address the auditing process and schedule. |
25. Training
| Define how the data management staff and site staff are trained on the topics listed at left (and any other topics as you see fit), how training is documented, re-training requirements, and how training records are maintained. |
References and Additional Resources
21 CFR Part 11, US Department of Health and Human Services, Food and Drug Administration, March 1997
Guidance for Industry Part 11, Electronic Records; Electronic Signatures Scope and Application, US Department of Health and Human Services, Food and Drug Administration, August 2003
Guidance for Industry E6 Good Clinical Practice: Consolidated Guidance, US Department of Health and Human Services, Food and Drug Administration, April 1996
Guidance for Industry Computerized Systems Used in Clinical Trials, US Department of Health and Human Services, Food and Drug Administration, May 2007
PIC/S Guidance Good Practices for Computerised systems in Regulated GXP Environments, PIC/S, September 2007
Susanne Prokscha, Practical Guide to Clinical Data Management, Third Edition, CRC Press, Oct 26, 2011
Approved for publication by Ben Baumann. Signed on 2021-02-23 11:13AM
Not valid unless obtained from the OpenClinica document management system on the day of use.
Revision History
| Revision | Published | Approved By |
|---|---|---|
| 2021-02-23 11:13AM | Ben Baumann | |
| 2021-02-23 11:04AM | Ben Baumann |
Was this article helpful?
That’s Great!
Thank you for your feedback
Sorry! We couldn't be helpful
Thank you for your feedback
Feedback sent
We appreciate your effort and will try to fix the article